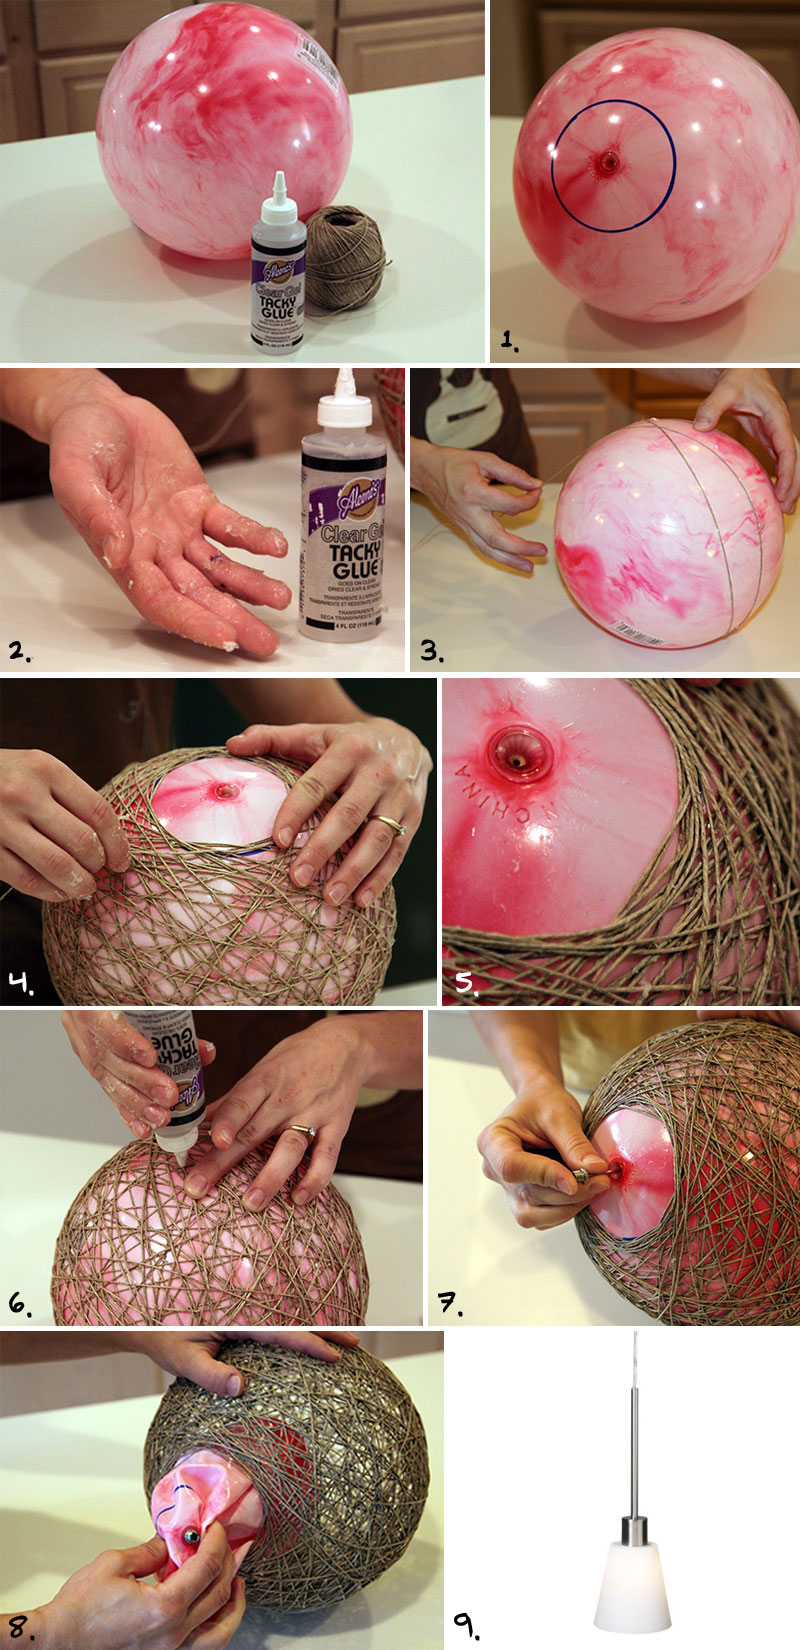
Hello everybody! I'm excited to share this next project with you. Of course, it's all over Pinterest (how boring my life would be without that website!). I've always liked the look of them, and I thought a lighted one would be great in my new room.
 |
| ^Current room |
Yay!
From what I've heard, string/yarn 'chandeliers' (most aren't actually lighted) have been around for several years (my grandma used to make them! Hi Grandma!).
Most of the tutorials I saw for these chandeliers used string/yarn wrapped around normal balloons, but I wasn't really a fan of the "oblong" shape you get from balloons. Then I saw this:
A bouncy ball?! How great! The instructions for the above chandelier required tacky glue, which I didn't have, so I combined it with another tutorial to get my results. Here's my version!
Supplies
1 plastic inflated bouncy ball, any size (mine is 14" in diameter)
Any kind of string or yarn (you can use hemp, yarn, even thread - I used Red Heart Crochet Thread from Walmart, about $2-3 for 1000 yds)
School glue, approx. 4 ounces
Corn starch, 1/2 cup
Water, 1/4 cup
Plastic container
Spoon
Sharpie
Scissors
Paper towels and/or rubber gloves (this is messy!)
Lighting kit (I got mine at Pier 1 for about $10)
Ball inflating needle
Drop cloth or trash bag
Prep
First, lay out your drop cloth. You may also want a pole or hook to hang your ball from. This is what I started out with:
My intention was to tape a string to the ball, and tie the string to the pole. After trying several methods (scotch tape with string, duct tape with string, duct-taping the ball to the pole, etc.), I figured out that what worked best for me was just to hold the ball in my lap. Sure, I got rather messy, but it was so much easier!
Next, draw a circle with your Sharpie around the, um, inflating hole? This is going to be the opening in your chandelier, through which you'll insert your light source. Make it AT LEAST 2.5" in diameter - larger, if your lightbulb/hardware requires it.
I drew a slightly larger circle around my 2.5" circle for good measure. (Don't mind the rectangle.)
Remember, this hole is where your light will go. DO NOT cover it with your yarn/string.
Mix
In a disposable plastic container, mix your cornstarch and water (don't worry about mixing it too well, it won't become smooth and creamy no matter how long you stir it!). Then start adding glue until you get the desired thickness. Mine was like a thick soup; it could've been thicker though. You want it thin enough to stir easily, but the more runny it is, the more messy!
Wrap
I couldn't really take any pictures of this step, as both my hands were quite messy.
First, I dipped my fingers in the glue/cornstarch mixture and coat a good length of the string with it. Then, placing the end of my string along the circle I drew, I started wrapping. You can really wrap any way you want, but here's what helped me:
- Like I said earlier, I held the ball in my lap so I would have the most control over it. If you use this method, try to let the mixture-covered string dry on the ball before you turn it. With this mixture, it should dry pretty quickly.
- Avoid clumps of glue/cornstarch! Unless, of course, you like the slightly imperfect look (my mom does). I was fairly messy with my wrapping and dripping because on all the other tutorials, the writers said the globs of glue would just "flake off". Mine did not. I had to break most of them off with pointy objects...not so fun.
- Once you start getting your ball well covered and you're wondering how much more to do, check to see if there are any large openings in the yarn, where you can see more than 1/2 square inch of the ball. Wrap your string around so that it intersects those openings; this will make the structure stronger.
- REMEMBER, do NOT let string inside your drawn circle. DO make sure the string touches the edges of the circle on all sides though.
Continue wrapping until you deem your ball as covered as you wish, then wrap your string up towards the circle opening, snip it with the scissors, and tuck the end away, nice and hidden.
Dry
If your chandelier-in-progress has been hanging as you've been working on it, great - leave it hanging for at least twenty-four hours. If not, prop it on something so that it will not tip over, making sure nothing is touching any part of the string. For me, that something was a very small Toy Story cup.
Hehe!
Wait
Hum de dum............
.........
Deflate & Remove
After your twenty four hours are up, it's deflatin' time!
Get your inflating needle and poke it into the hole in your ball.
You should hear the air hissing out at first; after a while, though, it's likely to stop deflating on its own. Here's the tricky part.
If you don't have a bone for an arm like I do, get someone who does, who can stick their hand in the opening and squeeze the air out of the ball.
If your ball is like mine, it will not easily come out of the chandelier, even when the air has been squeezed out. I actually had to wrap rubber bands around the ball, using one hand in the chandelier and a few fingers poking in from outside, to make it into a tube that would be able to be pulled out of the hole.
PHEW!
Light
Oh dear. This was my least favorite part. I had to improvise, as I could find nothing online as to how anyone else had installed lights in their chandeliers. What I came up with is a bit silly, but hey, it works!
(If anyone has a better idea, please let me know!)
Aaaaand you're done!
Now everyone, go make your own! :)
Read More......